SCARECROW IS THE BEST!
I've been a HUGE fan of Scarecrow Video ever since I moved to Seattle and was told by Jason (see Memento review below) that it was mandatory that I visit. I was even given an assignment by my friends to rent episodes of "Almost Live" so I could understand Seattle better (tangent; years later, I got to meet one of the high-fivin' white guys in person!) I highly encourage anyone who has a love of film and TV to visit the largest video store in the world. Scarecrow's collection is at least THREE TIMES larger than all of streaming media (Netflix, Hulu, Disney + , etc) combines!! And did you know that you can RENT BY MAIL from them?!? It's true! Click Here to become a member today!
Since they've moved to non-profit, they have different levels of membership. And of course, there are different rewards at each level. At the $500 level, you are allowed to curate your own section of up to 100 titles! I finally made that donation. They were extra super nice and let me divide my section into two parts; MOVIE MEMES and TROY'S ALPHABET OF FILMS AND TV.
Below are both lists. At the store, you'll see images of the meme on each cover.
Also, here is their blog entry about this curated section, complete with pictures!
I also wanted to say a few words about why I chose some of the films in my Alphabet:
Troy's Alphabet of Films & TV (37)
Adventure Buddies
These comedy adventure gems are made by Scarecrow employees and were screened in Seattle. I genuinely love the enthusiasm that went into their work!
(TV) The Adventures of Brisco County Jr.
This was my introduction to Bruce Campbell. Fun mix of comedy and adventure.
The Angel's Share (2012)
A heartfelt and charming journey of some young Scottish folks trying to get set on the right path. It involves whisky.
Being Human (1994)
Robin Williams plays several characters throughout time. I just keep remembering parts of it decades after having seen it.
City of Lost Children (1995)
Ron Perlman in a very stylized and gritty world (If you like this, check out Jan Svankmajer's and Brothers Quay's works!)
Dazed and Confused (1993)
A Day in the Life of teens. Matthew McConaughey, Jason London, Mila Jovovich, and Adam Goldberg all in the same film! If you like this check out Waking Life by the same director.
The Doors (1991)
Val Kilmer plays Jim Morrison in this Oliver Stone film. I wore round wire rimmed glasses to the theater when I watched it so I could look 60s retro. High Schoolers do weird things.
Everything Everywhere All at Once (2022)
Choosing one film starting with the letter E was a challenge. On the shortlist was:
- Easy Rider (Already in my list of "Happy Endings*")
- Eating Raoul (already in my list of "Movie Posters You'd Find in a Video Store in the 80s"
- Eight Days a Week (really problematic film about a next door stalker boy, and in my list of "Problematic Films That I've Watched")
- El Norte (easily the most meaningful and most important films I've seen starting with the letter E)
- Empire Strikes Back (The Star wars section is just two end caps to the right of my section though)
- Eraserhead (required watching in college)
- Escape from New York
- Eternal Sunshine of the Spotless Mind (I can't remember what it's about. Maybe I should watch it again ;) )
But I had to go with Everything Everywhere All at Once for a few reasons. It's a recently released film that is amazing. People don't have to get over the hurdle of watching a film from before they were born to appreciate it's beauty. The characters are relatable. All the actors bring their A game, and I want to highlight James Hong in particular for the breadth he played in this film. His performance alone is makes it worth being on my list of all time favorites. The story is outrageous and worth several rewatchings to gleam more and more of it, while at the same time the core message about relationships and family are easy to grasp and powerful. And the rocks really sold it for me. One might say I added this totally popular film to my section to draw more traffic to it. They're not entirely wrong, but I do honestly think that people who enjoy this film will like a large percentage of the other films I have in my section. Happy viewing!
(TV) Freaks and Geeks
This nails the vibe of what high school was like in the 80s!
The Life and Times of Grizzly Adams
There is no better cure for chicken pox or the flu than Chicken noodle soup with buttered crackers while watching Grizzly Adams. It might not speed up the recovery time, but it makes the time spent a little better.
G Runner Up:
Get Crazy. Made by Alan Arkush (who's very active on Letterboxd, by the way). It's a love letter to outrageousness.
HIS REVIEW:
Can you review a movie that you made? I need a ruling on that! I was rewatching to prepare for the new Blu-Ray release.
So NO I don't sit around and watch my old movies & TV shows.
Some
really embarrassing nudity, bad jokes, unconvincing performances, &
underwritten characters. On the other hand whole sections still make me
laugh, the music scenes all work especially Nada & Piggy and I LOVE
Malcom McDowell every time he's on the screen.
Does that count as a review? AND I didn't turn off the TV!! Also I am really happy that it's finally coming out. AT long last.
MY REVIEW:
Allan, I just rented a copy of this from Scarecrow Video in Seattle
(largest video store in North America, includes videos lacking from the
Library of Congress). If you ever visit Seattle, I'll happily buy you
dinner and take you there!
This movie was positively gratuitous!
Gratuitous cartoon comedy, gratuitous nudity, gratuitous violence,
gratuitous car chase scenes. No reason for those scenes except to have
them. And yet, it has such an overall positive feel to it.
Other
movies from that era would be really problematic now (and thank you for
pointing out its flaws in your review), but there weren't really any
racist jokes (sure, you had a Jews band instead of a Blues Band, and
dipped a little into stereotypes but they weren't played negatively)
Heck,
you pointed out that every band there was ripping off King Blues, and
you made Willy's character strong mentally and physically. No one needed
to save her; she saved herself.
I'm about 30 minutes into the
After Party, but I'd love to hear about which parts of the movie were
things that really happened when you worked at the Fillmore. I'd love
for you to make the movie you wanted to make, without the 80s influence
the studio demanded.
Thanks again for an amazing underrated (aka suppressed by the studio) film!
Head (1968)
It's sorta about the Monkees, but its really about commercialism. You can watch sober, drugs are redundant for this film.
The Iron Giant (1999)
About every 5 minutes when I first watched this I kept saying to myself, "Disney would NEVER do this!" Post Gravity Falls, I recant that. They've improved. This movie is still so amazing.
Jacob's Ladder (1990)
The memory of it comes up in my life when things get weird. IYKYK. This movie stayed with me in a good way.
Jodorowsky’s Dune (2013)
Amazing story of a film never made...
Kubo and the Two Strings (2016)
One of Laika's best shows. Great animation and storytelling.
Lair of the White Worm (1988)
I love the 80s twist on a vampire tale. The psychedelic video FX scenes are such an amazing aesthetic.
Memento (2000)
Jason, Have you seen Memento?
The Complete Metropolis (Kino blu-ray 2010 reissue, includes 25 minutes of restored footage)
Groundbreaking film from 1927. If this is too long for you, Kino has a shorter version, or check out the 1984 rock video version below. I've even seen it with a live soundtrack composed by Brian McWhorter while I lived in Eugene. I later found that recording on CD at Scarecrow and bought it there!
Giorgio Morodor, presents Metropolis (1984 Giorgio Morodor, Kino Blu-ray)
Morodor produced a new soundtrack, color tinted the film, and reintroduced it to audiences in the 80s. I saw it in the 90s, and it was my entry point to watch the original., listed above
Monster House (2006)
This is the only Hollywood film that I've worked on to date. I helped setup the then largest Motion Capture System in the world in the historic Desilu Studios lot, now owned by Sony Pictures (tangent, I saw Ken Lerner of Buffy the Vampire Slayer fame in the cafe
there, but protocol was that I wasn't to approach any actors). So, I HAD to include this entry. It's a decent film, and a good example of how Motion Capture doesn't always have to land squarely in the uncanny valley, when talented animators are part of the process. Speaking of the process, optical motion capture systems work by being able to see markers from more than one viewpoint by multiple cameras. That means set pieces and props block this view. They had an entire props department making wire-frame props. Somewhere, there resides a chicken wire Victrola Record Player made for this delightful animation.
Network (1976)
This was a cautionary tale. It became the TO-DO list for the FOX TV network.
(TV) Northern Exposure
This vibe. OMG, this vibe. I love everything about this show.
Nostradamus (1994)
Throughout my life, I keep wondering how accurate this show was. It seems like the ending could still hold true today. We're on track!
Orgazmo (1997)
After Parker and Stone made "The Spirit of Christmas", but before South Park was a TV show... they made a film parodying the porn industry. This is that film. It has Ron Jeremy in it.
Pow Wow Highway (1989)
Native focused, accessible for everyone. Gary Farmer from Reservation Dogs is also in it!
From Wikipedia:
a 1989 comedy-drama film from George Harrison's HandMade Films Company, directed by Jonathan Wacks. Based on the novel Powwow Highway by David Seals, it features A Martinez, Gary Farmer, Joanelle Romero and Amanda Wyss. Wes Studi and Graham Greene, who were relatively unknown actors at the time, have small supporting roles.
Quantum of Solace (2008)
Only film I've seen with Q at start of title.It's OK, It's a bond film. It has killings and explosions and fight scenes and fast cars and very attractive women. I don't remember the plot. Lemme google it... I'm tired, I scanned it, and I really can't make sense of it. I might go watch this again, but I'd rather watch a non-bond film. Seriously, consider renting "The Quiet Earth" instead. I saw a preview for it a bit ago, and it looks a lot more memorable. Yes, I am recommending a movie I have never seen over this. This is a list of movies I've seen, and I'm bound by those (self made) rules.
UPDATE 3/4/2024: You know what upsets me? The fact that I forgot that I could also include TV entries for Q. Because I should have said QUANTUM LEAP!! OMGWTFBBQ. Scott Bakula, please accept my deepest apologies.
Rare Exports: A Christmas Tale (2010)
First review on Letterboxd: "Nothing says Christmas like hundreds of naked elves running as a herd on the frozen tundra in subzero weather!" Great foreign film. Dark Comedy.
Shortbus (2006)
Film that approaches sexuality in a very unique way. Film with adult situations*, not an 'adult film'. Great exploration of sexuality! *One of those situations is, in fact, an orgy.
Smoke Signals (1998)
Wiki says: is a 1998 American coming-of-age comedy-drama film directed by Chris Eyre from a screenplay by Sherman Alexie, based on Alexie's short story collection The Lone Ranger and Tonto Fistfight in Heaven (1993). The film won several awards and accolades, and was well received at numerous film festivals.
In 2018, the film was selected by the Library of Congress for preservation in the United States National Film Registry for being "culturally, historically, or aesthetically significant."
I say that it's a film worth watching again.
Twelve Monkeys (1995)
Gotta love a movie with a happy ending!
UHF (1989)
Some problematic jokes haven't aged well (Supplies! Etc..), but worth viewing within the context of when it was made. Weird Al has a good heart. Also the only film I've seen that starts with "U"
The Visitors (1993)
Jean Reno travels from the dark ages to the present thanks to wizard magic. Hilarity ensues.
Wallace and Gromit "The Wrong Trousers" (1993)
Required viewing for those who love stop animation. Seriously, watch everything by Aardman animation. Start with "Creature Comforts" and work your way up. Scarecrow has all of them.
Waking Ned Devine (1998)
Heartwarming tale of friendship. When a lottery winner dies of shock, his fellow townsfolk attempt to claim the money.
Xanadu (1980, only film I've seen that starts with X)
I was young, I don't remember it that well. But, it has a great soundtrack!
Young Frankenstein (1974)
This should probably be in the movie memes section. "Class.... Dismissed!" Gene Wilder was amazing.
The Zero Theorem (2013)
You should probably watch everything Terry Gilliam has ever made. This one starts with the letter Z. (Also, watch The Man Who Killed Don Quixote!)
Movie Memes (53)
I had the idea of a new section for Scarecrow to showcase movie from which memes have been made. It stemmed from me not knowing which movie the nodding bearded guy came from (JEREMIAH JOHNSON, 1972). Seemed like a good idea at the time to make it, so let's see if this section becomes popular there! (please visit & rent from this section)
 |
| 30 ROCK 6.8 (Steve Buscemi “How do you do, fellow kids?”) |
 |
| AIRPLANE (Looks like I picked the wrong week to quit drinking, and about a million more) |
 |
| ASSASSINS (Banderas leaning back from laptop) |
 |
| AVENGERS (I understood that reference) |
 |
| THE BABADOOK (Why can’t you just be normal?) |
 |
| BABYFACE (*pours coffee on hand*) |
|
|
 |
THE BEE MOVE (You like jazz?)
|
 |
BORAT (Great Success)
|
 |
BRIDESMAIDS
|
 |
CAPTAIN PHILLIPS (I'm the Captain Now)
|
 |
| CASTLE - 2.9 “Love Me Dead" |
 |
CITIZEN KANE (clapping)
|
 |
| CLUE (I hated her so much, flames on the side of my face) |
 |
CLUELESS (As if!!)
|
 |
| COMMUNITY 3.4 (walking in with pizzas, room is on fire) |
 |
| DJANGO UNCHAINED ("I can't imagine two weeks in Boston") |
 |
DOWNFALL (Hitler Reacts)
|
 |
| FALLEN (relieved Denzel) |
 |
| FREAKS (one of us) |
 |
FRIDAY
|
 |
| FUTURAMA - 6.3 (Attack of the Killer App) |
 |
| THE GAME, Season 3 (Jason Momoa unfolding lawn chair) |
 |
GOODFELLAS (Ray Liotta Laugh)
|
 |
| THE GREAT GATSBY (Leo toasting) |
 |
| INDIANA JONES AND THE LAST CRUSADE (aging into skeleton) |
 |
| IT'S A WONDERFUL LIFE (broken record) |
(Don't hate me because the clearest image I could find was colorized!)
 |
| JEREMIAH JOHNSON (nod) |
 |
| JOKER (dancing down stairs) |
 |
LEGALLY BLONDE (What, like it's hard?)
|
 |
| LOOK WHO'S TALKING TOO |
 |
| LORD OF THE RINGS: FELLOWSHIP OF THE RING (One does not simply…) |
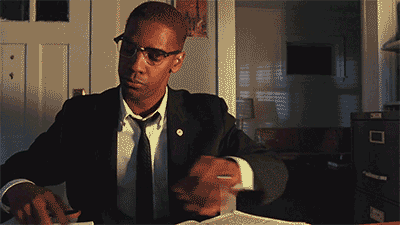 |
MALCOLM X (frustrated)
|
 |
| THE MATRIX (What if I told you) |
 |
MICHAEL JACKSON'S THRILLER (Popcorn)
|
 |
| OFFICE SPACE (That would be great) |
 |
| ONCE UPON A TIME IN HOLLYWOOD (pointing at screen) |
 |
| PRINCESS BRIDE (that word does not mean what you think it means) |
 |
PULP FICTION (confused Travolta)
|


