Showing posts with label Makerspace. Show all posts

Monday, December 11, 2023

My First (Partscaster) Guitar Build!

(Click on any picture to enlarge) 

Real talk: with the amount of effort and learning I put in, this should be considered a Partscaster+ build.

Presenting: BB!

While I didn't make the body from a block of wood, I did make additional carves and routs. I completely restained it and did the finish on my own, and custom wiring as well. But I'm getting ahead of myself....

Last year, Lance Gregory of Rebirth Guitars posted a pic of a guitar body on the Amateur Luthier Facebook group, asking if he should start over from scratch. It looked amazing. I joked that he should just mail it to me to throw in the trash for him! We started a conversation, and he sold it to me at a good discount along with some hard ware. It arrived in great shape. I knew about the stain errors as he already sent me multiple photos.

Stain seeped a little past the masking tape in a few spots

I got to working on the clear coat. I've done some woodworking around the house, so I just started with Varathane. I didn't realize it at the time, but it is one of the harder coatings to get a mirror polish from.

Here's the tripod jig I made during the hand brushed coating stage:


I knew it would need sanding and polishing, but this was bad.

After spending a few weeks coating this and letting it dry before adding another coat, I went to polish it. I went through the polish in a spot and took out some of the stain. Lance gave me repair some tips, and I fixed those areas. So, a couple of weeks later and... again I burned through the polish. In retrospect, I think some of the stain lifted into the polish. It should have been fixed with lacquer first. I had no idea at the time! After all that work and after a long and exhausting day, in a fit of desperation I threw the body on the ground. I shouldn't have done that and I won't again. First and last time for everything. But its good to own your mistakes, so you can learn from them and do better.

Hey, at least I found out it's a semi-hollowbody!

 
I immediately set on gluing it back together. I intentionally carved out the breaks to make them more noticeable. I sanded off the rest of the finish and stain, and then glued it up (my first guitar glue up)

While I was at it, I carved the horn for comfort with hand chisels, and then painted the gouges gold as would be done on a Japanese vase.


I tested a tested on a board to make sure it would work:

And then I applied the same technique to my guitar. Almost... I should have stained it first:

I used copper tape to make the dam.

Before additional sanding


I then did some additional stain tests with the new clear coating I chose. Crystalac was recommended by several luthiers because of how well it polished. It's a small business too, so that's a bonus. But, it was causing the TransTint stain to act like watercolors on my tests:

 
I contacted them, and they immediately gave me a tip on how to prevent this: spray lacquer over it first. 

After that, I was able to get my staining and clear coating done! This still took a long time. After the lacquer, there was a grain filler, then over ten airbrushed coats of Brite Tone, with at least four hours between coats.

You can still see the epoxy trough lines. That grain absorbed less stain

I then gave it a couple of weeks to cure before polishing. At the time, I just had a random orbital sander, and I had no idea at how bad it was for this job, even with the foam pad attachments:

I got to wiring it up. These are Lollar Imperial pickups, handmade in Tacoma. I decided to keep all the wiring, in case I want to put them in something else:

I got a laugh out of this temp rig!


I then cut, stained, and clear coated the body cavity cover, using red oak ply. Around this time, I found a buffer attachment for my drill. It worked so well I repolished as much of the body as I could:


Cover is buffed with drill, body was buffed later. What a difference!

I got a Solo guitar neck with a paddle head so I could make my own shape:


Sketched these ideas on my phone!


I settled on this design. I created the logo based on how I've signed hundreds of video game posters, then printed it onto decal material. It was also covered in several layers of Crystalac... and I had to try this technique twice to get it to work. Turns out if the decal is on a matte surface, when gloss goes on top of it, there is a visible line. I'm glad I took the time to fix that problem!


I then worked with my friend Josh Jones at TablePlay to get the serial number engraved. While his main business is laser cutting and UV printing things for the table top world, he was also happy to take on a custom job!

BB stand for "Bar Brawler" since it looks like it survived a big fight

The second to last thing I needed to do was to either get a new 3-way switch or fix the one I had. It's a brand new Fender switch, but it was designed to be mounted on much thinner material. Wanting to wrap this up before the holidays, I found some square stock in my garage, hacked off a piece, and soldering iron 'brazed' it onto the existing switch. Works! I'm not planning on selling this, so I don't mind it having a few quirks.


The final thing I did was talk to my friend Dagna at Silesia Guitars to show her my first build. In the time it took to bring it there, the cold in my trunk threw off the neck and the frets were buzzing a lot more than I expected. She gave me some tips on how to do a proper fret level and crown.

There's a lot of other tangents on this journey. I put a new nut in the neck, I tried a lot more stain and coating experiments than were shown, and there were wiring problems that were later fixed

This was a fun journey. I've already got a couple of friends that want a custom guitar built by me now, and I'm looking forward to making them something even better!


Sunday, November 28, 2021

Helping a Neighbor with 3D Printing


My neighbor has an aquarium that just seems intent on sharing its watery insides with his floor. They already had to replace the floor once because of it, and just the other day, it failed again. Had no one been home, it would have cost them their new floor!!

The problem was the clips that hold a piece of glass over the top. They were too short and the glass can fall inside, messing up the pump.

So, they asked if I could make a replacement. Here’s one of the four clips:

original aquarium clip

That lip in the is just a little too short. Since I only have PLA handy right now, I want to make sure it could hold the (about one pound, I’d later find out) piece of glass. So, I over engineered it:

I first took measurements with calipers, drew out the current one, and came up with some options to prototype:

This was a very simple design, so I made two versions in Tinkercad. It's a free website where anyone can create all sorts of simple models.

Tinkercad designs. One is longer, in case short one was too weak.

I made this design simply by making a larger box, adding two 'hole' boxes and then grouping them together.


Example of how to use boleans in Tinkercad.
Before grouping

I took the models into a beta version of Cura to slice them. The beta version is designed to make stronger pieces by adjusting the infill thickness (I used Chep's 4.12 setting profiles)

Arachne beta 2 slicer from Cura

Here’s the results. They are a lot thicker than the original, by design!

original clip with 3D prints

I took the smaller of the two and decided to stress test it:

First Stress test, about 28 pounds
Hard to see, just above the welded metal.

Stress test of 50 pounds.
I was ready to run at any moment!

25+ pounds had no effect for about three minutes. The last photo is a 50 pound solid piece of metal that I’ve used as a makeshift anvil! I tested for about a minute. I would have gone longer, but I needed to help balance it, and I wasn’t wearing steel toed boots! 

While these pieces won’t be submerged in water, I decided to coat them with acrylic anyway to help keep moisture out. I plan on making PETG replacements soon, and this material is stronger and handles water and UV better, but wanted them to have something they could use now.

Sunday, October 17, 2021

Additional Projects

Here are some projects that I'm proud to share:

Demo Reel Playlist

Includes some motion capture work (including the first team to integrate mocap into their 48 hour game jam!), videos that I produced and edited, and oh yeah, wearable LED experiments. 

Demo Reel Playlist


Backsplash Design and Puzzle

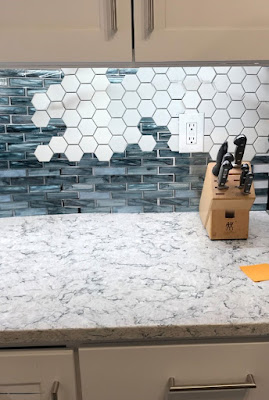
In 2020, our kitchen suffered water damage and required a complete cabinet replacement. I came up with a unique backsplash pattern. No contractor would take this job on due to its complexity, so I decided to do it myself. 

Remodeled Kitchen, white and blue backsplash


After extensive material tests and photoshop compositions we arrived at these two tiles. Because we had under cabinet LEDS, some worked better than others. This composite image was what sold me on these tiles and the more complicated design idea:


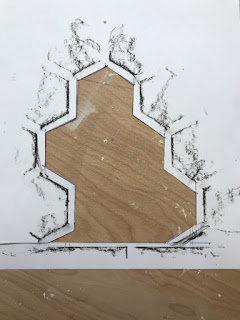
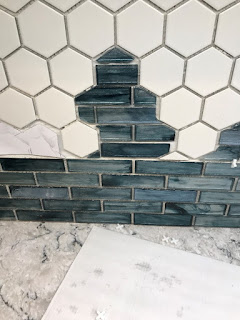
Laying down the hex tiles was fairly easy in retrospect. Getting the rectangle tiles cut to size was a bit of a challenge. To speed up the process, I made tracings of the gaps in the hex tiles, and noted where the lines needed to go:

Crayon rubbing on wall to reveal hole size and shapeHole filled in with blue tile


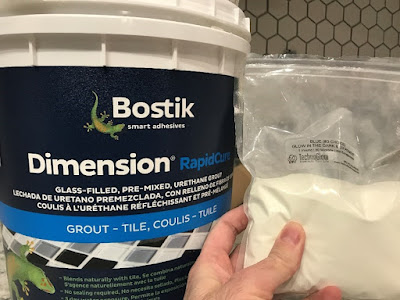
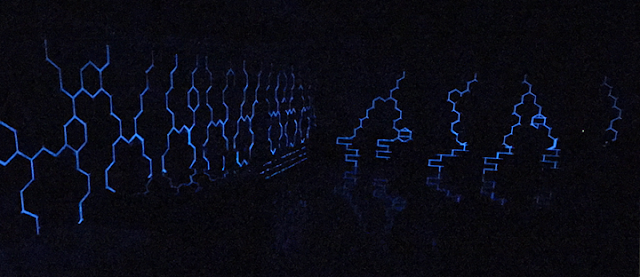
This was the combo that made the magic: Translucent grout and Technoglow Ultra Glow Blue.

Bostik Dimension RapidCure grout and Technoglow Ultra Glow #3 Blue

The final results (only a fade is photoshopped, no other manipulation done to images) Over a year later, and I’m still happy when I see this at night:


Corner of coutnertop in the dark, with glowing grout lightning patterns
 

AdaFruit Electronics Design & Scripting, 3D Design & Printing, Sewing:

This project is something I've wanted to do for a long time, and finally had a compelling reason to do it. I mean, who doesn't want glowing 3D printed barnacles on the back of their jacket?!?


Here's my (abbreviated) process:
I measured that panel of my jacket:


I sewed a piece of denim that would fit that spot. I modified my original idea to include room for a pocket to hold the battery (upper right). Clasps were sewn onto it and the jacket

I sewed on Flora NeoPixels, using 2ply conductive thread:

Backside of jacket attachment, showing clasps & conductive thread

I 3D printed a housing for a Gemma M0, and attached that to the jacket:

3D printed housing for Gemma M0 Microcontroller

I designed the barnacles in Maya, exported to Cura and made a few iterations to best work with the jacket


Barnacle design in Maya
 
Nine of the same barnacle designs in Cura, ready to print
 
Fitting a Flora Neopixel into a 3D printed Barnacle


Once it was all together, I scripted different patterns for the design:

Jacket Modification attached to computer with USB cable

Final result (see above for video!)

Attachement Snapped onto Jacket, and lit


3D Printing:

In addition to the above jacket attachment and three PPE mask sewing templates I designed and shared on Thingiverse, I also have also designed snowflakes, and helped a friend replace a lost chess piece.

Snowflakes

This snowflake was designed in Illustrator, but because it had a more complicated grouping than other designs I've made, it wasn't working well in Tinkercad. Some of the holes were still filled in, no matter what settings I changed. So, I took the SVG from Illustrator into Blender, and extruded the shape there, exported an STL, and then sliced it in Cura. 

The takeaway is to not be tied to any given pipeline when designing something. 

Custom Snowflakes I made for family

Chess Pawn

A close friend of mine knew I had a 3D printer, and wanted to replace a missing chess piece from a set he got in Mexico. He presumed I also had a way to 3D scan items. I figured out how to do it with my iPhone 7, and a free version of 3DF Zephyr Free. After taking 30 photos of the piece outdoors on a cloudy day, I was able to get it to successfully reconstruct! Not bad for a shiny object. I took it into maya to clean it up a little, and to make a solid base. From there, I exported an STL and brought into Cura for slicing.

Reconstruction in Zephyr Free
 

Here they are next to the original piece, after I hand painted them (always make a backup):

Miniature painting techniques paid off!
 

And, here is is reunited with the rest of the set:


Sets, Props, and Motion Capture:

Taken from my time at Bungie, this showcases my ability to solve all sorts of problems by making props and set pieces, usually with limited time and resources:
2019 Troy McFarland Mocap Demo Reel

Pictured: the incredible mocap actor, Richard Sloniker!

Art From Scratch:

I tried to make a painting completely from scratch! I made several pigments and met Theodore Gray in the process, but have yet to complete this project. Something to hop back on at some point:
Troy McFarland, Art From Scratch


Copper + vinegar = (toxic) blue/green crystals!


Rock Video:

I wrote, produced, directed, edited, and carved/sculpted the puppets for this rock video by Vinni Blue:
Vinni Blue: Forever


Vinni Blue

Gravity Paintings:

I create paintings that change color depending on the angle they are viewed. Link to one of my faves:
Gravity Painting #10


As seen from the front, click link for other views


Music:

After learning the basics of Ableton Live, I challenged myself to make an album in one week. I hesitate to post this, as it seems like everyone has an album these days. But, I'm very excited to continue to dive into Ableton. In conjunction with Max for Live, I would have the ability to make some very interesting installation pieces that can take real time data/input to affect compositions and even lighting!
1 Week 1 Album Challenge

List of genres we came up with to work on. Dice roll determined: lo-fi chiptunes!