Showing posts with label Science. Show all posts

Saturday, November 25, 2023

Exhibit: Star Spectra 2.0

Star Spectra 2.0 with Designer Stephanie Delancey and myself

Quick note: Opinions expressed on my blog are my own and do not necessarily reflect the Pacific Science Center.

I've been in the Exhibits department with Pacific Science Center for over a year (come visit!!), and finally finished my first redesign of an older exhibit.

If I remember the schematics correctly, Star Spectra was designed in the late 80s or early 90s. It was designed to teach guests that cold stars are red, and hot stars are white. Because this was before the advent of  blue LEDs, they left out the fact that blue stars were the hottest of them all. It was built using incandescent light bulbs. Here's a shot of it:

Original Star Spectra

It had seen better days, and the circuitry was eating incandescent light bulbs like popcorn. I was ecstatic to be asked to work with our design manager, Stephanie Delancey, and create the new version! This would be my first time working with an Arduino to make something. I've done other things in Circuit Python, but Arduino is more responsive and takes up less memory. So, I got to learn Arduino from scratch. I'm very happy to have the support to do things like that on the job.

The First challenge was to find a way to make a gradation that went from red, orange, yellow, white, and blue, while skipping green. There is a TON of code for rainbows online. And why not? Rainbows are awesome and they look pretty on just about anything, and they show off what RGB LEDs can do! But green stars don't really exist, so it couldn't be part of our exhibit. Coming from an art design background, the easiest way for me to solve the problem was to start by making the gradient in Affinity Photo and then observing what was going on in the gradient by using the eyedropper. I then turned that image into a graph for each color. Here's the result:

Art Major Does Math! (typo on right, should say 1024)

After that, I was able to figure out several ways to make this gradient in Arduino. I first did it with a series of if statements, but then a FX professional friend in the game showed me another way that used a lot less lines of code.


Afterwards, I experimented with illuminating spheres. I was able to find some opaque Christmas tree ornaments that lit up really well from an Adafruit ringlight. Results:


Cheap Ornaments cut in half. Lego characters for scale.

But ultimately, Stephanie wanted to go in another direction. She was hoping to have a flatter display. So, I tested the same LEDs with Lighting White from Tap Plastics. I used a PVC pipe to prevent light leak, and the results were really good!

Scissors and Hersey's Kiss wrapper for scale


With this knowledge and Stephanie's design notes, I built a protoype in TinkerCad. It's free, I know how to use it, and we had limited time to get this done. With it, I was able to overcome most design errors. (If I was to redesign it, it would still add certain reinforcements to the box so it doesn't sag when I open it up for maintenance)
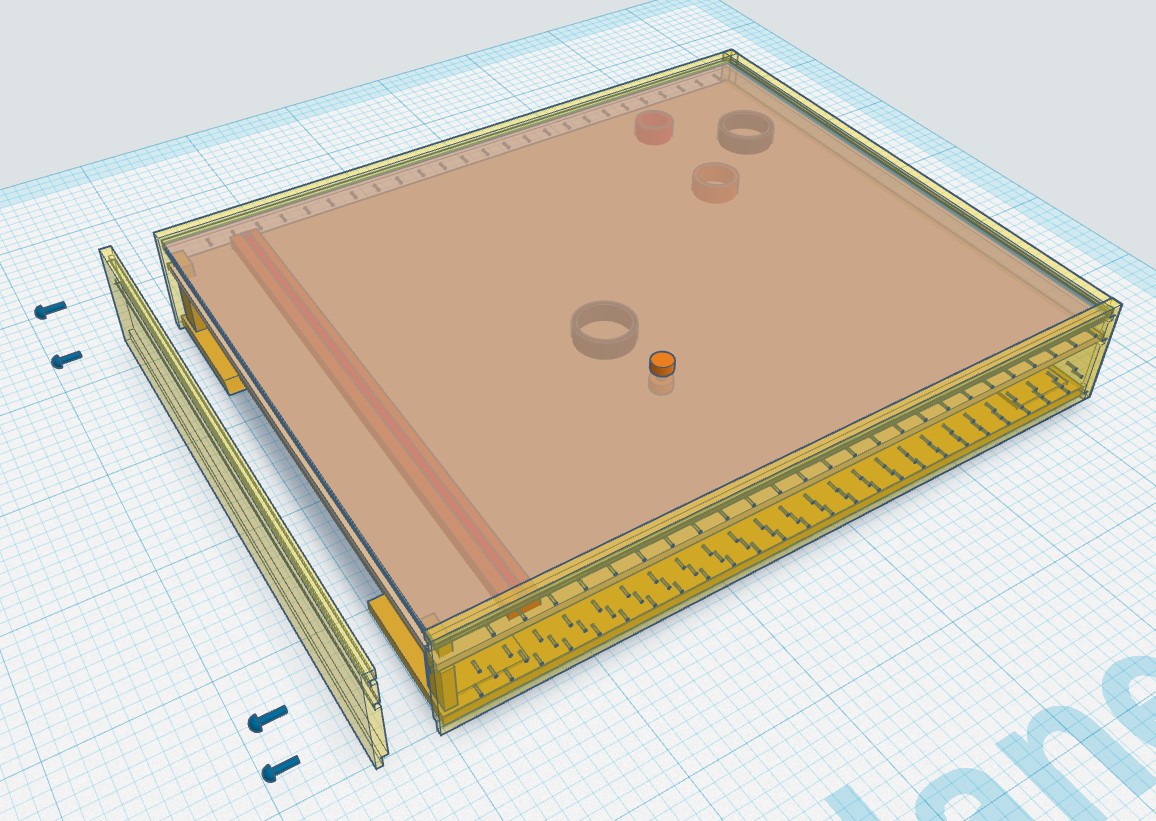


From this, my coworker Alexa Lewis started building the box, and I started working on the code and circuitry. Arduino is a lot more strict than Python! But, thanks to help from a coworker, friends, the internet, and yes, even ChatGPT for two sections (I had to correct its mistakes, but it told me why it wrote things a certain way which was super helpful!), I was able to to get the code done. I got to borrow an empty office while coding, and was very happy to find my very own mini ducky in there! Good Omen:

Inspirational Ducky. Great for debugging!! Arduino Uno for scale

Afterwards, I moved onto wiring everything up. I had some practice soldering together guitar parts, but this was a lot more delicate! I was REALLY happy to find a single power supply that output 5 VDC for the LEDs and 12 VDC for the Ardunio Uno. Total win!

I was nearly done, but still had to make the control knob. I was planning on using a guitar knob, but I knew that it would wear out or break quickly. I was mentioning this to a friend at their going away party, and their friend offered to donate a rotary encoder from a decommissioned CNC router!! This thing is built like a tank. It took a little more code, but it was SO worth it! It feels great and is very sturdy:

Donated Rotary Encoder


Encoder in its new housing with a Molex connector

And with that, and a bunch of more work building onto the removable board, and we were done!

Almost... Turned out that the graphic's words were dark (see top image), and needed backlit. With very little time left, I went to a local craft store and bought LED fairy lights. They plugged right in:

All the things. Glove, stapler & gaffer tape roll for scale

Back side of board. Power supply is on this side to protect LEDs from heat

I was honored to be asked to build this and am looking forward to making more exhibits soon!

Sunday, May 24, 2015

Are Costco Exclusive Callaway Balls Identical to Chrome Soft?

There is a fair amount of speculation  about the Hex Control ball. There's been a rumor going around that the Callaway golf balls available exclusively at Costco is either identical to their premium Chrome Soft ball or the older Hex Hot.   Here's the chatter on GolfWRX

And, for $30 for two dozen (or $60 for four dozen online) compared to MSRP of $37.99 ONE dozen for Chrome Soft balls, who can blame anyone for wanting to save a few dollars.

Callaway's Chrome Soft golf ball was the highest rated ball in Golf Digest's June 2015 issue, in all categories but demand.  But after that review, we'll see if demand goes up! According to them, it has better feel than the Pro V1.  That's right, better feel than the so-called best ball on the market.

I called up Callaway to find out from the source.  It was a brief conversation (spent most of the time talking about the Callaway X-Hot clubs set, which are a smoking deal for someone who needs a new set.  Note that they sell lefty and stiff models too!)  I was told that the closest thing on the market in 2015 to the Hex Control was in fact the Chrome Soft.  I asked if the only difference was the logo.  They implied the cover was the only difference, without exact words to that effect.

Let's take a closer look.

Specs on the Chrome Soft:
3-piece
Cover: Thermoplastic Urethane
Dimple pattern: HEX Aerodynamics

Specs on the Hex Control:
3-piece
Cover: Trionomer Blend
Cover Hardness: 56D
Dimple pattern: HEX Aerodynamics

So, right there we know that the cover material is different.  Being that urethane is a much more expensive material, I'm neither surprised nor disappointed by this.  The Hex pattern on all modern Callaway golf balls seems identical to me.

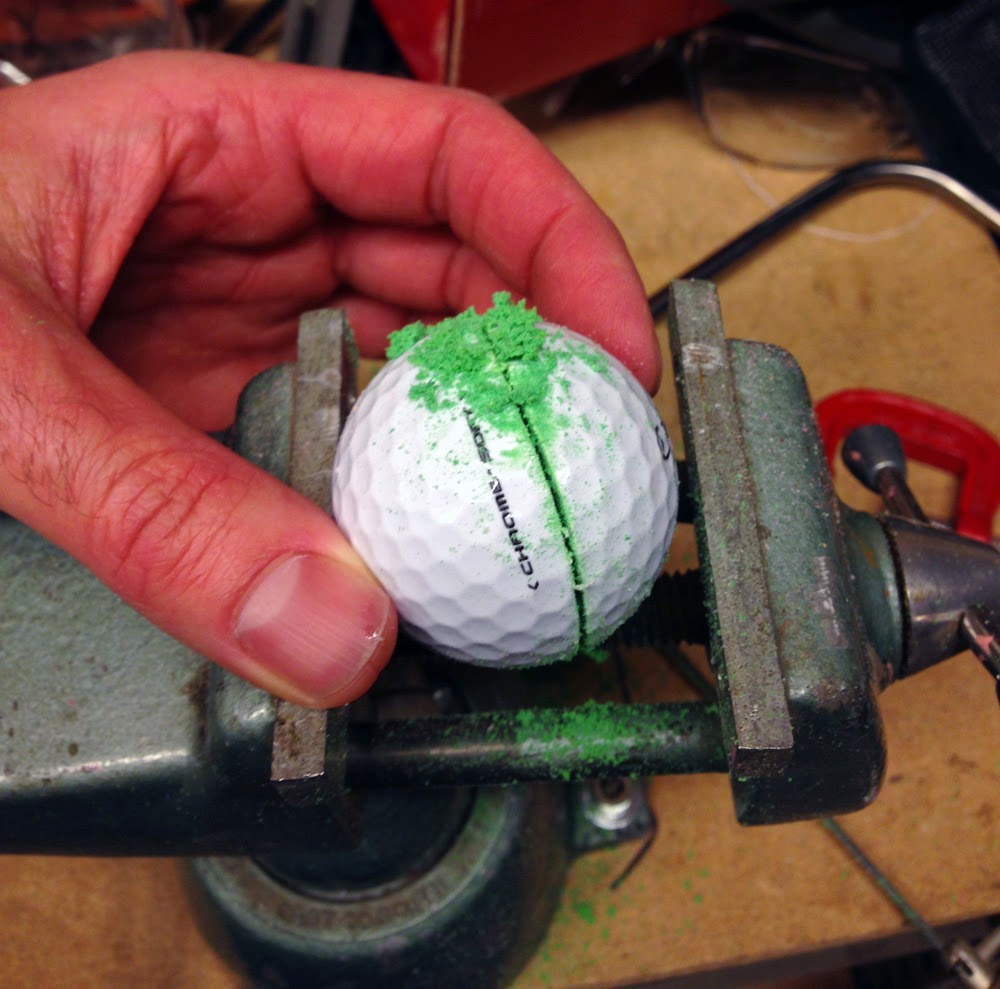
But, what about the inside?  There was only one way to find out, so here are the results of a little vice and jig saw work:


Results:
Here's the inside of the Callaway Hex Control.  I found this watercolor palate to be the perfect holder!  (How many golfers out there would have one?  Seriously, if you do paint and golf, please comment!)


OK, what about The Chrome Soft?
Nope!  This matches the photos in the Golf Digest article, minus the blue circle in the very center.  As my cut was off center a bit and the saw blade left discoloration patterns on the ball, I'm not surprised it is not noticeable.

Here's the big differences:

The Chrome Soft has a thinner outer layer.  When I cut it, it was a lot stickier and softer.  It was also noticeably harder to cut, due to the sticky softness.  It closer to rubber than plastic and was surprisingly tough!

If I was to guess, I'd say the thin middle layer material is identical to both.  And obviously, the inner layer is different.  The green material smelled different when cut, and stuck to itself more, like you can see in the top photo. 

So, Chrome soft was been ruled out.  Others have said it was a rebranded Hex Hot, or perhaps the Chrome Supersoft with an extra layer.

Here's all four balls side by side:
Chrome Soft, Hex Control, Supersoft, Hex Hot (Yellow)


All are different!

Detail shots:  Note that the Supersoft material does not match the 2015 Golf Digest article.  This particular Supersoft ball was found on a golf course with a corporate logo.  I'm not sure if the performance is a little different, or if the dye lot is the only thing different with the material.


Older Big Bertha & Big Bertha Diablo shots in case you were wondering:


Conclusion:
The Callaway's Costco exclusive Hex Control ball is not a relabeled Chrome soft or Hex ball, It is it's own unique ball.  The cover is thicker, and fairly durable.  The performance is great for me (a mid to high handicapper)  The reviews on GolfWRX are outstanding.  It is still a high performance ball, and is perhaps the best value per dollar that you can find on the market for well known balls (Snell, you want to send me a sleeve or two to review?  I'd be happy give you my honest opinion!)

The Chrome Soft ball is made of more expensive materials.  The cover on the Chrome Soft will likely give you more greenside control, because it's literally stickier when attacked with a metal object.

Suggestion:  If you are a mid to high handicapper and lose a ball or two per round, the Hex Control may be the best ball for you because due to the price/performance factor.  And, it's a great backup/practice/early season ball for better players.

But in terms of quality, if you can afford it (and won't lose it), go for the Chrome Soft.

Saturday, January 9, 2010

I'm crying on the inside

Check out this incredible article on io9

Best line in this article: "The upheavals of war and natural disasters over 2,000 years have probably caused us to lose many more works and wonders that will never be found."

Every time I hear about things like the library of Alexandria being burnt down, or the Parthenon being blown up because the Turks lobbed a cannon ball in there, or the Taliban destroying ancient Buddhist artwork, I cry on the inside. Imagine where we could be now if it was not for all of these setbacks.